Marking a Queen Bee: Essential Guide for Beekeepers
Marking a queen bee is a vital task for beekeepers. It helps in identifying and tracking the queen easily.
For beekeepers, knowing the queen’s location is crucial. Marking the queen bee allows for quick identification during hive inspections. This practice makes it easier to monitor the queen’s health and performance. A well-marked queen can save time and reduce stress for both the beekeeper and the colony.
The process is simple and can be done with minimal tools. Whether you are a novice or an experienced beekeeper, understanding how to mark a queen bee is an essential skill. It not only improves hive management but also ensures the well-being of your bee colony.
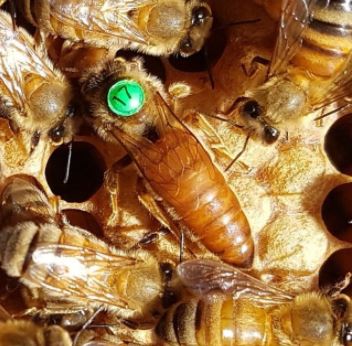
Credit: meyerbees.com
Introduction To Queen Bee Marking
Marking a queen bee is crucial for beekeepers. It helps in identifying the queen quickly. This practice makes hive management easier and more efficient.
Importance Of Marking
Marking a queen bee has several benefits:
- Easy Identification: A marked queen is easy to spot during hive inspections.
- Colony Management: Knowing the queen’s age helps in making informed decisions about hive health.
- Preventing Swarm: Marking helps in tracking queen movements, preventing unexpected swarms.
These benefits are vital for maintaining a healthy and productive bee colony.
When To Mark A Queen
Choosing the right time to mark a queen bee is essential. Here are the best times:
- Spring: This is an ideal time as the queen is less likely to fly away.
- Queen Introduction: Marking when introducing a new queen to the hive ensures you can monitor her acceptance.
- Swarming Season: Marking during swarming helps in tracking the queen if the colony splits.
Marking a queen bee at the right time ensures the process is safe and effective.
Tools And Materials Needed
Marking a queen bee is an essential task for beekeepers. It helps in tracking the queen’s age and improving hive management. To do this job well, you need the right tools and materials. Let’s explore the key items you need to mark a queen bee.
Marking Pens
Marking pens are vital tools for this task. These pens come in different colors. Each color represents a specific year. This helps in identifying the queen’s age quickly. Choose pens with non-toxic, quick-drying ink. This ensures the queen’s safety. Also, select pens with fine tips. They offer better control and precision.
Cages And Holders
Cages and holders are necessary for safely holding the queen bee. They prevent her from moving during marking. One popular choice is the one-handed queen catcher. It allows easy capture without harming the bee. Another option is the queen marking tube. It holds the queen securely while you apply the mark. Ensure the cage or holder is well-ventilated. This keeps the queen comfortable and stress-free.
Preparing For The Marking Process
Marking a queen bee is an essential task for beekeepers. This process helps in tracking and managing the hive more efficiently. Before marking the queen, preparation is key. Ensuring the hive is calm and identifying the queen are critical steps.
Calming The Hive
A calm hive is safer for both the bees and the beekeeper. Use a smoker to gently calm the bees. The smoke masks alarm pheromones and reduces bee aggression. Light the smoker with natural materials like pine needles or burlap. Ensure the smoke is cool to avoid harming the bees.
Puff a few clouds of smoke at the hive entrance. Wait a few minutes to let the smoke spread. Open the hive slowly and carefully. Avoid sudden movements and loud noises. This keeps the bees calm and makes the process smoother.
Identifying The Queen
Spotting the queen is crucial before marking her. She is usually larger with a longer abdomen than worker bees. The queen has a different behavior; she moves steadily and is often surrounded by worker bees.
Look for the queen in the brood area. This is where she lays eggs. Use a queen catcher or gently pick her up with your fingers. Be gentle to avoid injuring her. Once identified, you can proceed with the marking.
Step-by-step Marking Procedure
Marking a queen bee makes hive management easier. It helps in quickly locating her during hive inspections. Below is a step-by-step procedure to mark your queen bee efficiently and safely.
Capturing The Queen
First, identify the queen bee among the worker bees. She is usually larger and has a longer abdomen. Use a queen clip or a marking cage to capture her gently. Ensure you do not harm her during this process.
Once captured, carefully move the queen to a secure and stable surface. A small piece of white paper or a plastic card works well. This helps in clearly seeing the mark you will apply.
Applying The Mark
Use a non-toxic paint marker suitable for bees. Gently hold the queen in place. Apply a small dot of paint on the middle of her thorax. Avoid using too much pressure or too much paint. The mark should be small but visible.
Allow the paint to dry for a few moments. This prevents smudging and ensures a clear mark. After the paint has dried, release the queen back into the hive. Observe her for a few minutes to ensure she is accepted back by the worker bees.
Post-marking Care
After marking a queen bee, ensure she receives proper post-marking care. This care is vital for her well-being and the hive’s health. The queen’s reintroduction and hive monitoring are key steps.
Reintroducing The Queen
Reintroduce the marked queen gently into the hive. Use a queen cage to protect her during this process. Place the cage in the hive, allowing the worker bees to adjust to her new scent. Leave the queen in the cage for at least one day. This helps the hive accept her without aggression.
Monitoring The Hive
Monitor the hive closely after the queen’s reintroduction. Check for signs of acceptance by the worker bees. Look for normal activities like egg-laying and worker bees tending to her. Ensure there are no signs of aggression or rejection. If issues arise, consider re-caging the queen for another day.
Regular hive inspections help ensure the hive’s health. Observe the hive’s behavior and the queen’s condition. A healthy hive indicates successful queen integration.
Common Challenges And Solutions
Marking a queen bee is a crucial task for beekeepers. It helps in tracking and managing the hive. However, it is not always straightforward. There are common challenges that beekeepers face. Below, we discuss these challenges and their solutions.
Queen Rejection
One of the most significant challenges is queen rejection. Workers may reject the marked queen.
- Reason: The scent of the marking substance can confuse the workers.
- Solution: Use a substance that mimics the hive’s scent. Alternatively, keep the queen separate for a few hours. This allows the marking substance to dry and reduces rejection chances.
Marking Mistakes
Mistakes during marking can harm the queen. This is another common problem.
- Reason: The queen may move suddenly, causing misapplication.
- Solution: Use a queen marking cage. This restricts her movement. Practice on drone bees to improve your technique.
Proper marking is vital. It ensures the health and safety of the queen. Understanding these challenges and their solutions can make the process smoother. Happy beekeeping!
Benefits Of A Marked Queen
Marking a queen bee brings many benefits to beekeepers. A marked queen makes hive management easier and more efficient. Identifying the queen quickly helps in managing bee colonies effectively.
Tracking Queen Age
Knowing the age of your queen bee is essential for hive health. A marked queen allows you to track her age accurately. This helps in planning for queen replacement. Older queens may become less productive. Keeping track of the queen’s age ensures the hive remains strong and productive.
A common method is using color codes. Each year has a specific color. This makes it simple to identify the queen’s birth year at a glance. Here’s a quick reference table:
| Year Ending | Color |
|---|---|
| 0 or 5 | Blue |
| 1 or 6 | White |
| 2 or 7 | Yellow |
| 3 or 8 | Red |
| 4 or 9 | Green |
Easier Hive Inspections
Hive inspections are crucial for maintaining healthy colonies. A marked queen simplifies this process. Finding the queen quickly allows beekeepers to assess the hive’s condition. This saves time and reduces stress for the bees.
During inspections, a marked queen stands out. This makes it easier to check her health and activity. You can monitor her egg-laying patterns and ensure she is productive. A marked queen also helps in identifying and addressing problems early. For example, if the queen is missing, you can take prompt action to resolve the issue.
In summary, marking your queen bee is a valuable practice. It aids in tracking her age and makes hive inspections more efficient. This leads to better hive management and healthier bee colonies.

Credit: www.thefarmerscupboard.com
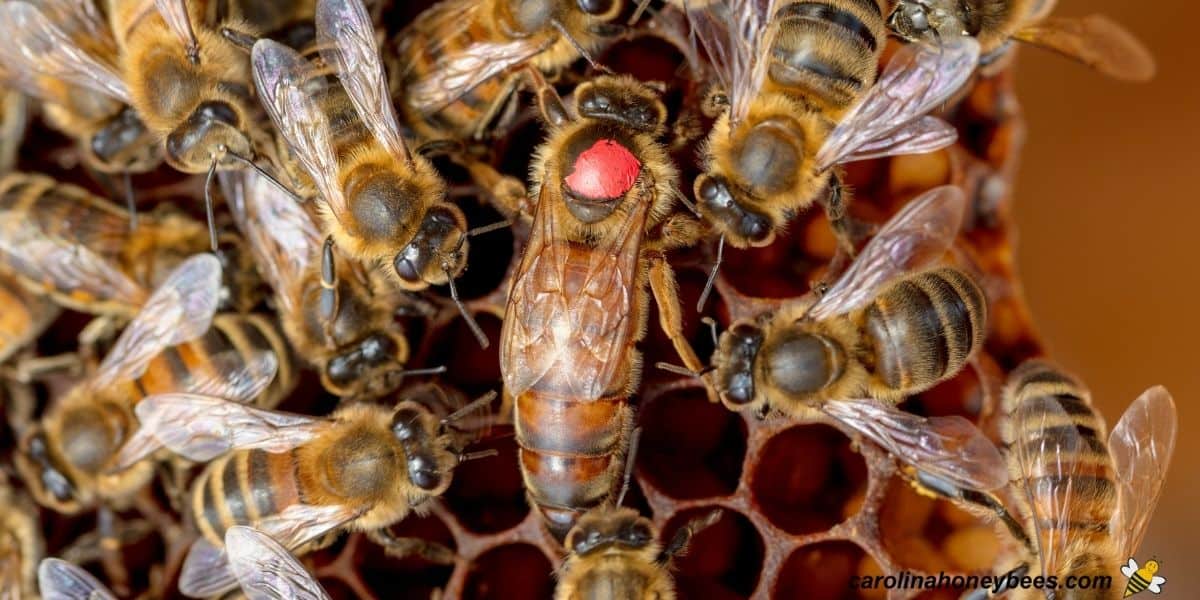
Credit: carolinahoneybees.com
Frequently Asked Questions
Why Mark A Queen Bee?
Marking a queen bee helps beekeepers identify her easily. It assists in tracking her age and health.
How To Mark A Queen Bee?
Use a special bee marking pen. Gently catch the queen and place a small dot on her thorax.
When To Mark A Queen Bee?
Mark the queen bee during spring or summer. This is when the hive is less stressed.
What Color To Mark Queen Bee?
Use specific colors for different years. This helps track the queen’s age easily.
Conclusion
Marking a queen bee is essential for beekeepers. It helps track her easily. This practice saves time and effort. It also ensures a healthy hive. Follow the tips we discussed. Your beekeeping journey will be smoother. Remember, patience is key.
Keep learning and observing your bees. Happy beekeeping!